# CountDownLatch 详解
# 简介
CountDownLatch 是 JUC 包下的一个工具类,主要用来协调各个线程之间的同步,是一个同步器。CountDownLatch 是基于 AQS 实现的,因此先了解 AQS 可以帮助理解 CountDownLatch 的源码。
CountDownLatch 的核心思想是让一些线程阻塞直到另一些线程完成一系列操作才被唤醒。它是通过一个计数器来实现的,计数器的初始值是线程的数量。每当一个线程执行完毕后,计数器的值就 ,当计数器的值为 时,表示所有线程都执行完毕,然后在闭锁上等待的线程就可以恢复工作了。
# 使用示例
import java.util.concurrent.CountDownLatch;

/**
 * 模拟六个同学离开教师之后,班长才关闭教室门
 * 分别演示使用 CountDownLatch 和不使用 CountDownLatch
 * 的效果
 */
public class CountDownLatchExample {

    /**
     * 使用 CountDownLatch 进行同步
     */
    private static void closeDoorUseCountDownLatch() throws InterruptedException {
        String name = Thread.currentThread().getName();
        System.out.println(name + "\t等待所有同学离开教室,班长再关门");
        CountDownLatch latch = new CountDownLatch(6);

        for (int i = 1; i <= 6; i++) {
            final int j = i;
            new Thread(()-> {
                System.out.println(Thread.currentThread().getName() + "\t"  + j + "号同学离开教室");
                latch.countDown();
            }, "" + i).start();
        }

        latch.await();
        System.out.println(name + "\t所有同学已经离开教室,班长关门");
    }

    /**
     * 不使用 CountDownLatch 进行同步
     */
    private static void closeDoorNotUseCountDownLatch() {
        String name = Thread.currentThread().getName();
        System.out.println(name + "\t等待所有同学离开教室,班长再关门");

        for (int i = 1; i <= 6; i++) {
            final int j = i;
            new Thread(()-> {
                System.out.println(Thread.currentThread().getName() + "\t"  + j + "号同学离开教室");
            }, "" + i).start();
        }
        System.out.println(name + "\t所有同学已经离开教室,班长关门");
    }

    public static void main(String[] args) throws InterruptedException {
        System.out.println("使用 CountDownLatch 控制");
        closeDoorUseCountDownLatch();
        System.out.println("========================");
        System.out.println("不使用 CountDownLatch 控制");
        closeDoorNotUseCountDownLatch();
    }
}
2
3
4
5
6
7
8
9
10
11
12
13
14
15
16
17
18
19
20
21
22
23
24
25
26
27
28
29
30
31
32
33
34
35
36
37
38
39
40
41
42
43
44
45
46
47
48
49
50
51
52
53
输出结果
使用 CountDownLatch 控制
main	等待所有同学离开教室,班长再关门
1	1号同学离开教室
2	2号同学离开教室
3	3号同学离开教室
4	4号同学离开教室
5	5号同学离开教室
6	6号同学离开教室
main	所有同学已经离开教室,班长关门
========================
不使用 CountDownLatch 控制
main	等待所有同学离开教室,班长再关门
1	1号同学离开教室
2	2号同学离开教室
3	3号同学离开教室
4	4号同学离开教室
5	5号同学离开教室
main	所有同学已经离开教室,班长关门
6	6号同学离开教室
2
3
4
5
6
7
8
9
10
11
12
13
14
15
16
17
18
19
可以看到没有使用 CountDownLatch 控制的话,没等所有同学都离开教室,班长就关门了,这显然不符合预期。
# 源码详解
CountDownLatch 是基于 AQS 实现的,CountDownLatch 的内部类 Sync 继承了 AQS,并以共享模式去重写指定方法。在 CountDownLatch 实例化时会初始化资源数 ,之后每次 countDown 都会将资源数减一,直到资源数为 后再唤醒等待线程。
# 内部类 Sync
private static final class Sync extends AbstractQueuedSynchronizer {
    private static final long serialVersionUID = 4982264981922014374L;

    // 构造函数,初始化资源数为 count
    Sync(int count) {
        setState(count);
    }

    // 获取资源数
    int getCount() {
        return getState();
    }

    // 以共享模式获取资源,
    // 1(正数)表示获取资源成功
    // -1 (负数) 表示获取资源失败
    protected int tryAcquireShared(int acquires) {
        return (getState() == 0) ? 1 : -1;
    }

    // 以共享模式释放资源
    // true 表示释放资源成功
    // false 表示释放资源失败,可能是因为当前线程没有持有资源或者资源已经被释放
    protected boolean tryReleaseShared(int releases) {
        // Decrement count; signal when transition to zero
        for (;;) {
            int c = getState();
            if (c == 0) // 当前线程没有持有资源
                return false;
            int nextc = c-1;
            if (compareAndSetState(c, nextc))
                return nextc == 0;
        }
    }
}
2
3
4
5
6
7
8
9
10
11
12
13
14
15
16
17
18
19
20
21
22
23
24
25
26
27
28
29
30
31
32
33
34
35
# 属性
CountDownLatch 只有一个 Sync 成员变量
public class CountDownLatch {
    // 同步队列
    private final Sync sync;
}
2
3
4
# 构造函数
CountDownLatch 只有一个构造函数,用于接收一个整型数字作为初始资源数。这个数字实际是传入到 Sync 中作为资源数。
public CountDownLatch(int count) {
    if (count < 0) throw new IllegalArgumentException("count < 0");
    this.sync = new Sync(count);
}
2
3
4
# countDown 函数
此方法调用一次资源数就减 ,直到资源数减少到 ,会去唤醒等待的线程。
下面是 countDown 方法的方法调用链。
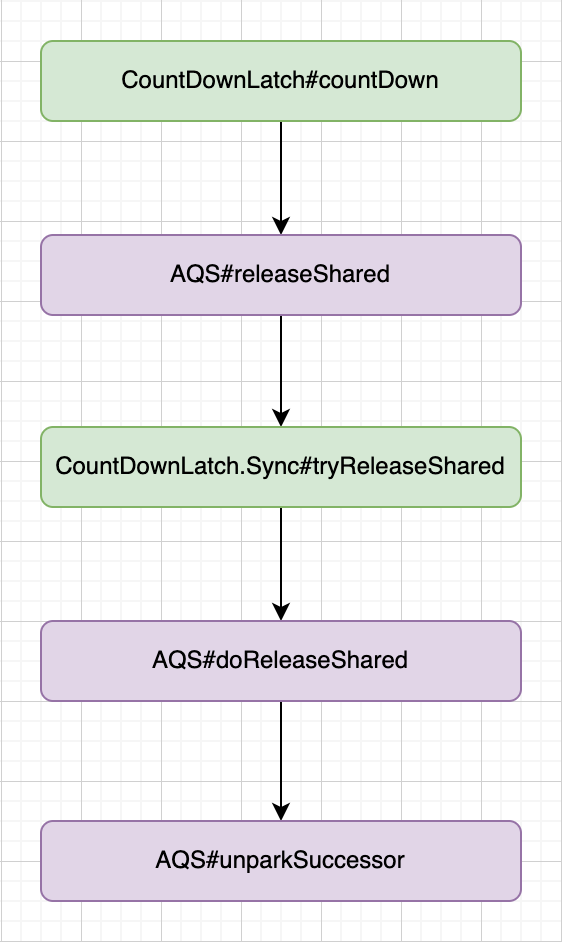
public void countDown() {
    sync.releaseShared(1);
}
2
3
sync.releaseShared 实际是调用 AQS 的 releaseShared
public final boolean releaseShared(int arg) {
    if (tryReleaseShared(arg)) { // 尝试以共享模式释放资源
        doReleaseShared(); // 资源释放成功后,再执行后续动作
        return true;
    }
    return false;
}
2
3
4
5
6
7
releaseShared 调用的 tryReleaseShared 实际是调用 Sync 重写的逻辑。
protected boolean tryReleaseShared(int releases) {
    // Decrement count; signal when transition to zero
    for (;;) {
        int c = getState(); // 获取资源数
        if (c == 0) // 资源数为 0,表示当前线程不占有资源,返回失败
            return false;
        int nextc = c-1;
        if (compareAndSetState(c, nextc))  // 资源数减一,然后 CAS 更新
            return nextc == 0; // 如果资源数为 0,表示资源释放完毕,否则还需等待继续释放
    }
}
2
3
4
5
6
7
8
9
10
11
doReleaseShared 方法会唤醒等待这些共享资源的其他线程,并保证能够正确的传播信号给等待这些资源的后继节点。
private void doReleaseShared() {
    /*
     * Ensure that a release propagates, even if there are other
     * in-progress acquires/releases.  This proceeds in the usual
     * way of trying to unparkSuccessor of head if it needs
     * signal. But if it does not, status is set to PROPAGATE to
     * ensure that upon release, propagation continues.
     * Additionally, we must loop in case a new node is added
     * while we are doing this. Also, unlike other uses of
     * unparkSuccessor, we need to know if CAS to reset status
     * fails, if so rechecking.
     */
    for (;;) {
        Node h = head;
        if (h != null && h != tail) { // 头节点不为空,并且头节点不为尾节点(队列中有其他数据)
            int ws = h.waitStatus;
            if (ws == Node.SIGNAL) { // 头节点的状态为 SIGNAL,那么它要负责唤醒后继节点
                if (!compareAndSetWaitStatus(h, Node.SIGNAL, 0)) // 不成功就重新来
                    continue;            // loop to recheck cases
                // 唤醒后继节点
                unparkSuccessor(h);
            }
            // 如果后继节点还未设置前驱节点的waitStatus为SIGNAL,代表目前无需唤醒或者不存在。
            // 那么就将头节点的waitStatus设置为PROPAGATE,代表在下次acquireShared时无条件地传播
            else if (ws == 0 &&
                     !compareAndSetWaitStatus(h, 0, Node.PROPAGATE)) // 状态为 0 并且修改状态不成功,则重新来
                continue;                // loop on failed CAS
        }
        if (h == head)                   // 头节点已经变化,则继续循环
            break;
    }
}
2
3
4
5
6
7
8
9
10
11
12
13
14
15
16
17
18
19
20
21
22
23
24
25
26
27
28
29
30
31
32
# await 函数
await 用来阻塞线程,直到计数器的计数变为 。当计数变为 之后,被阻塞的线程回被唤醒,继续执行任务。如果线程被中断,那么抛出 InterruptedException 异常。
下面是 await 方法的方法调用链。
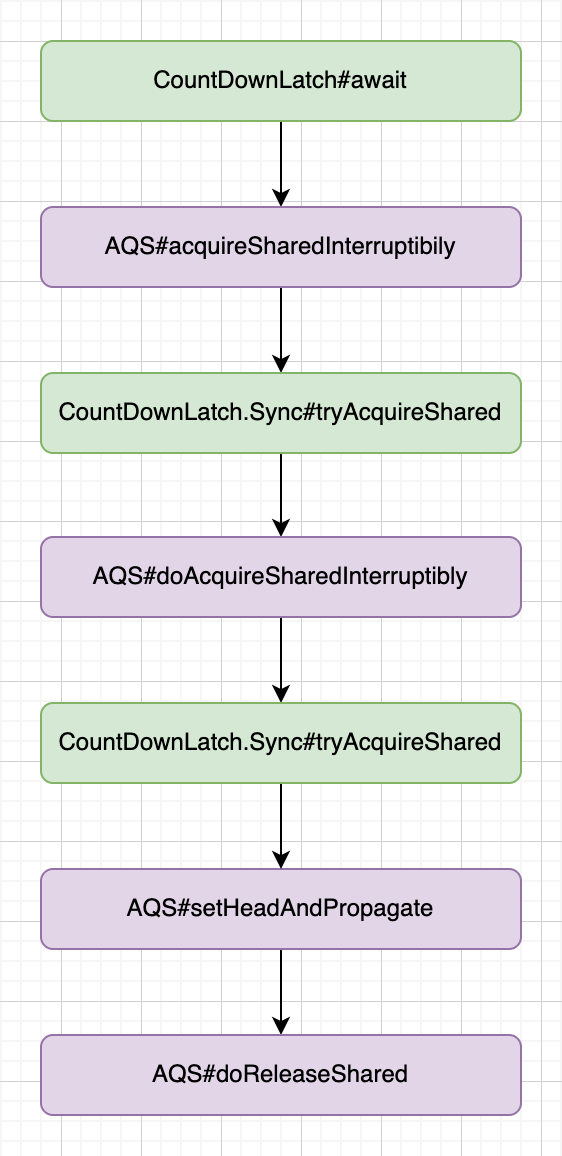
public void await() throws InterruptedException {
    sync.acquireSharedInterruptibly(1);
}
2
3
sync.acquireSharedInterruptibly(1) 实际是调用了 AQS 的 acquireSharedInterruptibly 方法,这个方法会尝试获取资源,如果获取失败,在进入 doAcquireSharedInterruptibly 方法。
public final void acquireSharedInterruptibly(int arg)
        throws InterruptedException {
    if (Thread.interrupted())
        throw new InterruptedException();
    if (tryAcquireShared(arg) < 0)  // < 0 表示获取资源失败
        doAcquireSharedInterruptibly(arg); // 自旋,不断尝试获取资源
}
2
3
4
5
6
7
tryAcquireShared 的调用实际是调用了 Sync 重写的逻辑。
// 以共享模式获取资源,
// 1(正数)表示获取资源成功
// -1 (负数) 表示获取资源失败
protected int tryAcquireShared(int acquires) {
    return (getState() == 0) ? 1 : -1;
}
2
3
4
5
6
doAcquireSharedInterruptibly 方法是在共享模式下通过自旋获取资源,并且在获取资源的时候,如果线程发生中断,则抛出 InterruptedException 异常。
private void doAcquireSharedInterruptibly(int arg)
    throws InterruptedException {
    // 将当前线程封装成队列的节点,模式是共享模式
    final Node node = addWaiter(Node.SHARED);
    boolean failed = true;
    try {
        for (;;) {
            final Node p = node.predecessor();
            if (p == head) { // 前驱节点是头节点
                int r = tryAcquireShared(arg); // 尝试获取资源
                if (r >= 0) { // r >= 0 表示获取资源成功
                    setHeadAndPropagate(node, r); // 将当前节点设置为头节点
                    p.next = null; // help GC
                    failed = false;
                    return;
                }
            }
            if (shouldParkAfterFailedAcquire(p, node) &&
                parkAndCheckInterrupt()) // 在获取失败后是否需要阻塞线程并且进行中断检
                throw new InterruptedException();
        }
    } finally {
        if (failed)
            cancelAcquire(node); // 资源获取失败,则取消获取
    }
}
2
3
4
5
6
7
8
9
10
11
12
13
14
15
16
17
18
19
20
21
22
23
24
25
26
代码中的 addWaiter、shouldParkAfterFailedAcquire、parkAndCheckInterrupt、cancelAcquire 方法在 AQS 详解 (opens new window) 一文中已经有过解释,这里就不赘述。
setHeadAndPropagate 方法是将 node 设置为头节点,并且
private void setHeadAndPropagate(Node node, int propagate) {
    Node h = head; // Record old head for check below
    setHead(node);
    /*
     * Try to signal next queued node if:
     *   Propagation was indicated by caller,
     *     or was recorded (as h.waitStatus either before
     *     or after setHead) by a previous operation
     *     (note: this uses sign-check of waitStatus because
     *      PROPAGATE status may transition to SIGNAL.)
     * and
     *   The next node is waiting in shared mode,
     *     or we don't know, because it appears null
     *
     * The conservatism in both of these checks may cause
     * unnecessary wake-ups, but only when there are multiple
     * racing acquires/releases, so most need signals now or soon
     * anyway.
     */
    // propagate > 0 表示当前线程已经获取到了资源
    // h.waitStatus < 0 表示后面的节点可以被唤醒
    if (propagate > 0 || h == null || h.waitStatus < 0 ||
        (h = head) == null || h.waitStatus < 0) {
        Node s = node.next;
        if (s == null || s.isShared()) // 如果后继节点是共享模式或者现在还看不到后继的状态,则都继续唤醒后继节点中的线程
            doReleaseShared();
    }
}
2
3
4
5
6
7
8
9
10
11
12
13
14
15
16
17
18
19
20
21
22
23
24
25
26
27
28
doReleaseShared 在上面已经有过解释,这里就不再赘述。
# 参考文章
- https://pdai.tech/md/java/thread/java-thread-x-juc-tool-countdownlatch.html
- https://blog.csdn.net/anlian523/article/details/106319294
- https://yangsanity.me/2022/06/11/AQS-PROPAGATE/
- https://zhuanlan.zhihu.com/p/115572393